


How to Consume REST API using Angular 5 HttpClient in Ionic 3 Mobile Apps
- Apr 21, 2018
- 3 min read

REST is a term of Representational State Transfer or in another word called Restful. This is more as an architectural pattern. Every modern web application uses REST web service as standard API that accesses web application resources from the mobile app or another application.
This blog post aims to simplified consuming REST API on Ionic 3 mobile apps using the new Angular 5 HttpClient. In this blog post I will show you how to use how to use free REST API testing endpoint in Angular 5 HttpClient.
Before getting started, accomplish following three main tasks:
- Install or update the latest Node.js - Install or update Ionic 3 using following command
sudo npm install -g ionic
- Optionally install or update Cordova if you're using it for run on the Android or iOS device
sudo npm install -g cordova
1. Create the New Ionic 3 App
First, Open your terminal or cmd and then go to the projects folder. Type this command.
ionic start ionic3-angular43-rest blank
Go to the newly created app project folder.
cd ionic3-angular43-rest
Make sure everything is working properly run the app in labs mode, it will open automatically in the browser.
ionic serve --lab
Sometimes, the above command will not work due to Ionic App Scripts (app-scripts) versioning problem. It occurs due to the new versions of app-scripts. Just downgrade app-scripts version in the package.json file as follows.
"@ionic/app-scripts": "1.2.2"
to
"@ionic/app-scripts": "1.1.4"
And then run npm install again.
Or there is another way to solve this. Just use following command in order to run the app.
npm run ionic:serve
2. Install and Configure the Angular 5 HttpClient
Firstly, Update all '@angular' dependencies with the latest version.
npm install @angular/common@latest --save
npm install @angular/compiler@latest --save
npm install @angular/compiler-cli@latest --save
npm install @angular/core@latest --save
npm install @angular/forms@latest --save
npm install @angular/http@latest --save
npm install @angular/platform-browser@latest --save
npm install @angular/platform-browser-dynamic@latest --save
Now, your 'package.json' dependencies look like this.
"dependencies": {
"@angular/animations": "5.2.9",
"@angular/common": "^5.2.10",
"@angular/compiler": "^5.2.10",
"@angular/compiler-cli": "^5.2.10",
"@angular/core": "^5.2.10",
"@angular/forms": "^5.2.10",
"@angular/http": "^5.2.10",
"@angular/platform-browser": "^5.2.10",
"@angular/platform-browser-dynamic": "^5.2.10",
"@ionic-native/core": "4.6.0",
"@ionic-native/splash-screen": "4.6.0",
"@ionic-native/status-bar": "4.6.0",
"@ionic/pro": "1.0.20",
"@ionic/storage": "2.1.3",
"ionic-angular": "3.9.2",
"ionicons": "3.0.0",
"rxjs": "5.5.8",
"sw-toolbox": "3.6.0",
"zone.js": "0.8.26"
}
Next, open and edit 'src/app/app.module.ts' then add this import.
import { HttpClientModule } from '@angular/common/http';
Then register it to '@NgModule' imports after 'BrowserModule', so it will look like this.
imports: [
BrowserModule,
HttpClientModule,
IonicModule.forRoot(MyApp)
],
3. Create Ionic 3 Service or Provider
Here I will implement the Angular 5 HTTPClient on the Ionic 3 service or provider.
First Create the service or provider file by type this command.
ionic g provider Rest
It will create 'rest.ts' file and 'rest' folder inside 'providers' folder and also register it on 'app.module.ts'. Now, open and edit 'providers/rest/rest.ts' then replace 'http' import by new Angular 5 HTTPClient.
import { HttpClient } from '@angular/common/http';
Also, replace 'Http' injection in the constructor.
constructor(public http: HttpClient) {
console.log('Hello RestServiceProvider Provider');
}
Next, I will create all REST API call inside 'rest.ts' file. Here I will use free REST API testing endpoint from JSONPlaceholder. JSONPlaceholder is a free online REST service that you can use whenever you need some fake data.
Add this line before the constructor.
apiUrl = 'https://jsonplaceholder.typicode.com';
Add this functions after constructors.
getUsers() {
return new Promise(resolve => {
this.http.get(this.apiUrl+'/users').subscribe(data => {
resolve(data);
}, err => {
console.log(err);
});
});
}
4. Display Data in View
To display data in the view, open and edit `src/pages/home/home.ts` then add this import.
import { RestProvider } from '../../providers/rest/rest';
Inject the `RestProvider` to the constructor.
constructor(public navCtrl: NavController, public restProvider: RestProvider) {}
Add variable for holds users data before the constructor.
users: any;
Create a function below the constructor for calling the users from the provider then fill users variable.
getUsers() {
this.restProvider.getUsers()
.then(data => {
this.users = data;
console.log(this.users);
});
}
Now, call that function inside the constructor.
constructor(public navCtrl: NavController, public restProvider: RestProvider) {
this.getUsers();
}
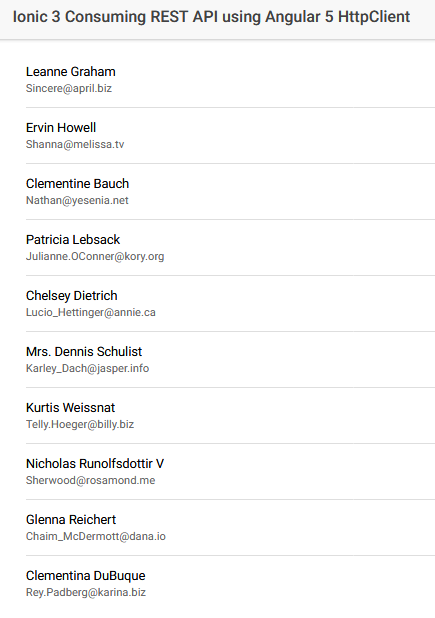
Then, open and edit 'src/pages/home/home.html' then replace '<ion-content>' and it's content using this.
<ion-content>
<ion-list inset>
<ion-item *ngFor="let user of users">
<h2>{{user.name}}</h2>
<p>{{user.email}}</p>
</ion-item>
</ion-list>
</ion-content>
Now, you can see the data on the browser like this.
Find the GitHub repository where I have uploaded the source code in this. Hope you enjoyed this article. If you have any questions just leave a comment below or mail me via chathurangijks@gmail.com.
Cheers!
Comments